Here, we’ll be looking at an automated setup to export Facebook Ads Data in Google Sheet & then uploading it in google analytics.
You can call this a DIY Tool.
The process is simple & we’ll be using Facebook Marketing APIs & Google Analytics APIs to do the same.
You can get started in a few minutes.
Here’s what you’ll get
- Full Quota Usage: Export Unlimited rows of Facebook Ads data.
- Reporting Automation: Schedule Your Facebook Reports Hourly/Daily/Weekly/Monthly.
- Unlimited Imports To GA: Import Facebook Ads Data in Google Analytics
- UTM Feature: Export facebook UTM values in the spreadsheet.
- Currency Conversion: Convert Facebook Ads currency while export
- Emailers: Send emails on upload.
- & More…
Exited?? Let start….
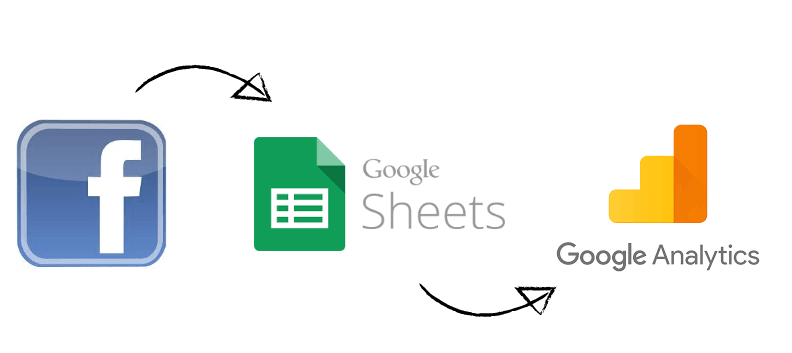
Here’s what you’ll get in the spreadsheet.
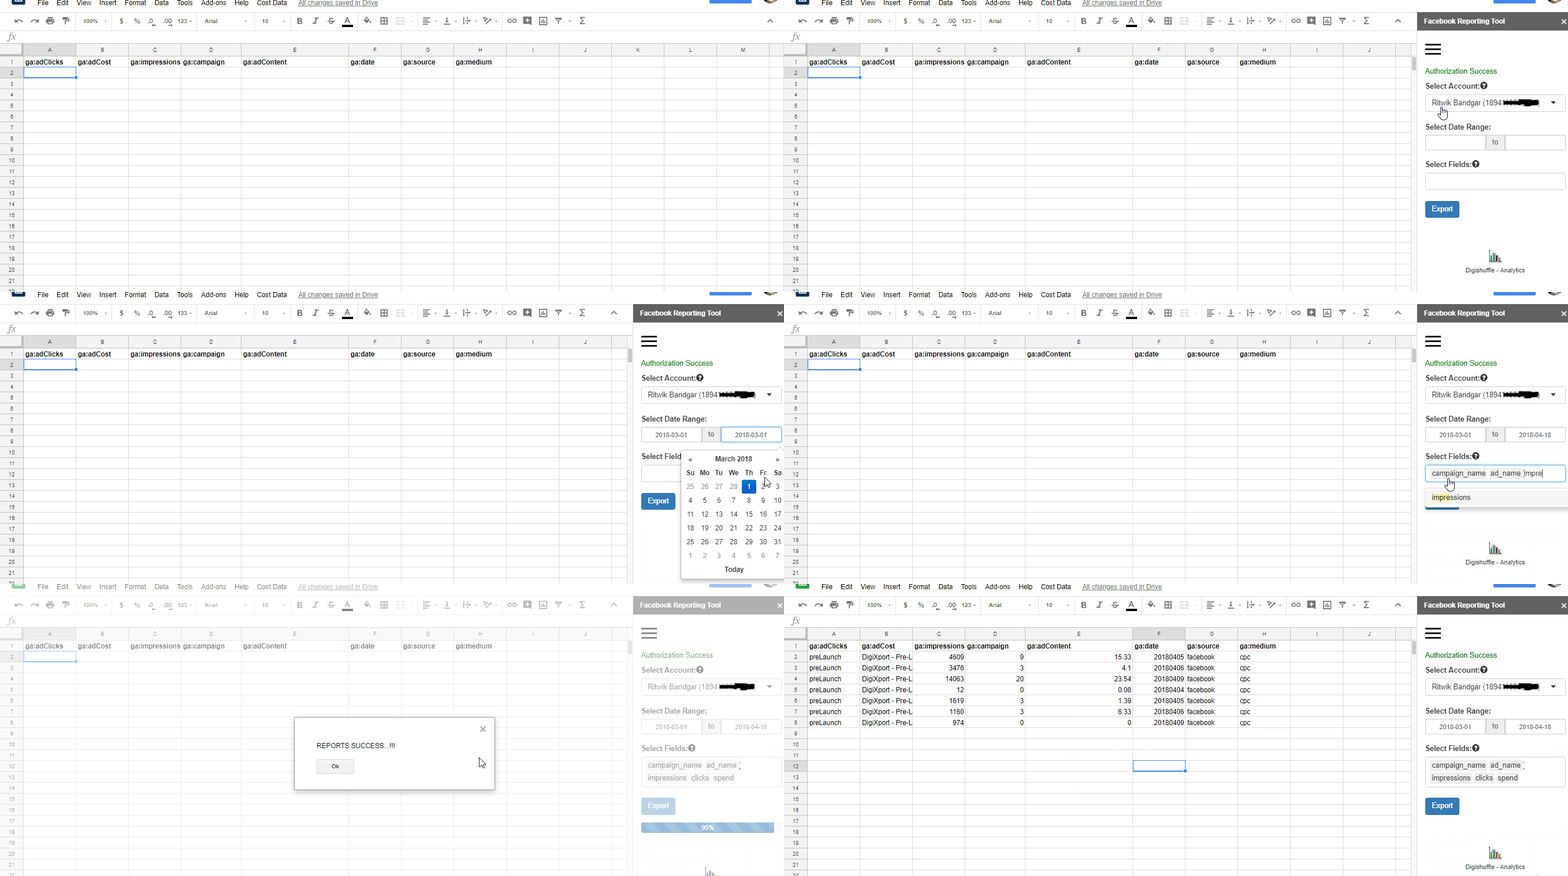
#1 Exporting Facebook Data into Sheets
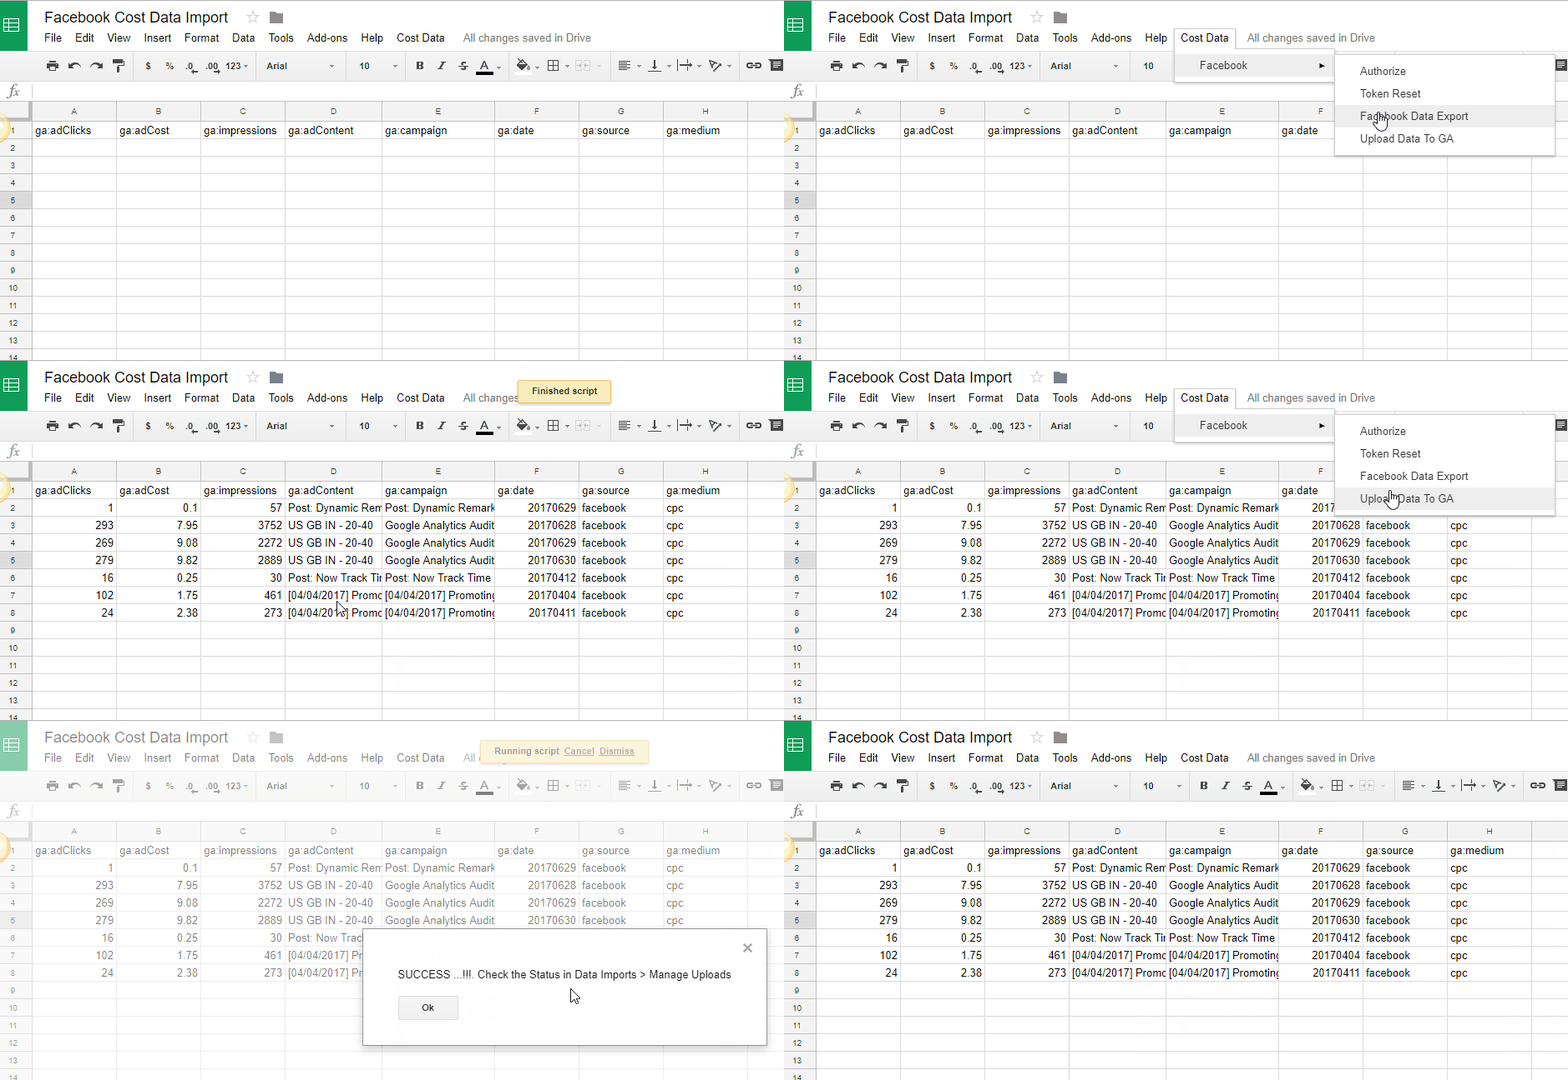
#2 Uploading Facebook Data into Google Analytics
#3 Reporting Automation
You can also use triggers in App Scripts to automate the facebook exporting & google analytics uploading process. More on this later…
Here, I have used:
Also, I am assuming the Ad URLs in Facebook are properly tagged with UTMs.
So, lets get started with the setup.
Facebook Cost Data Import in Google Analytics – Setup Process
Step – 1
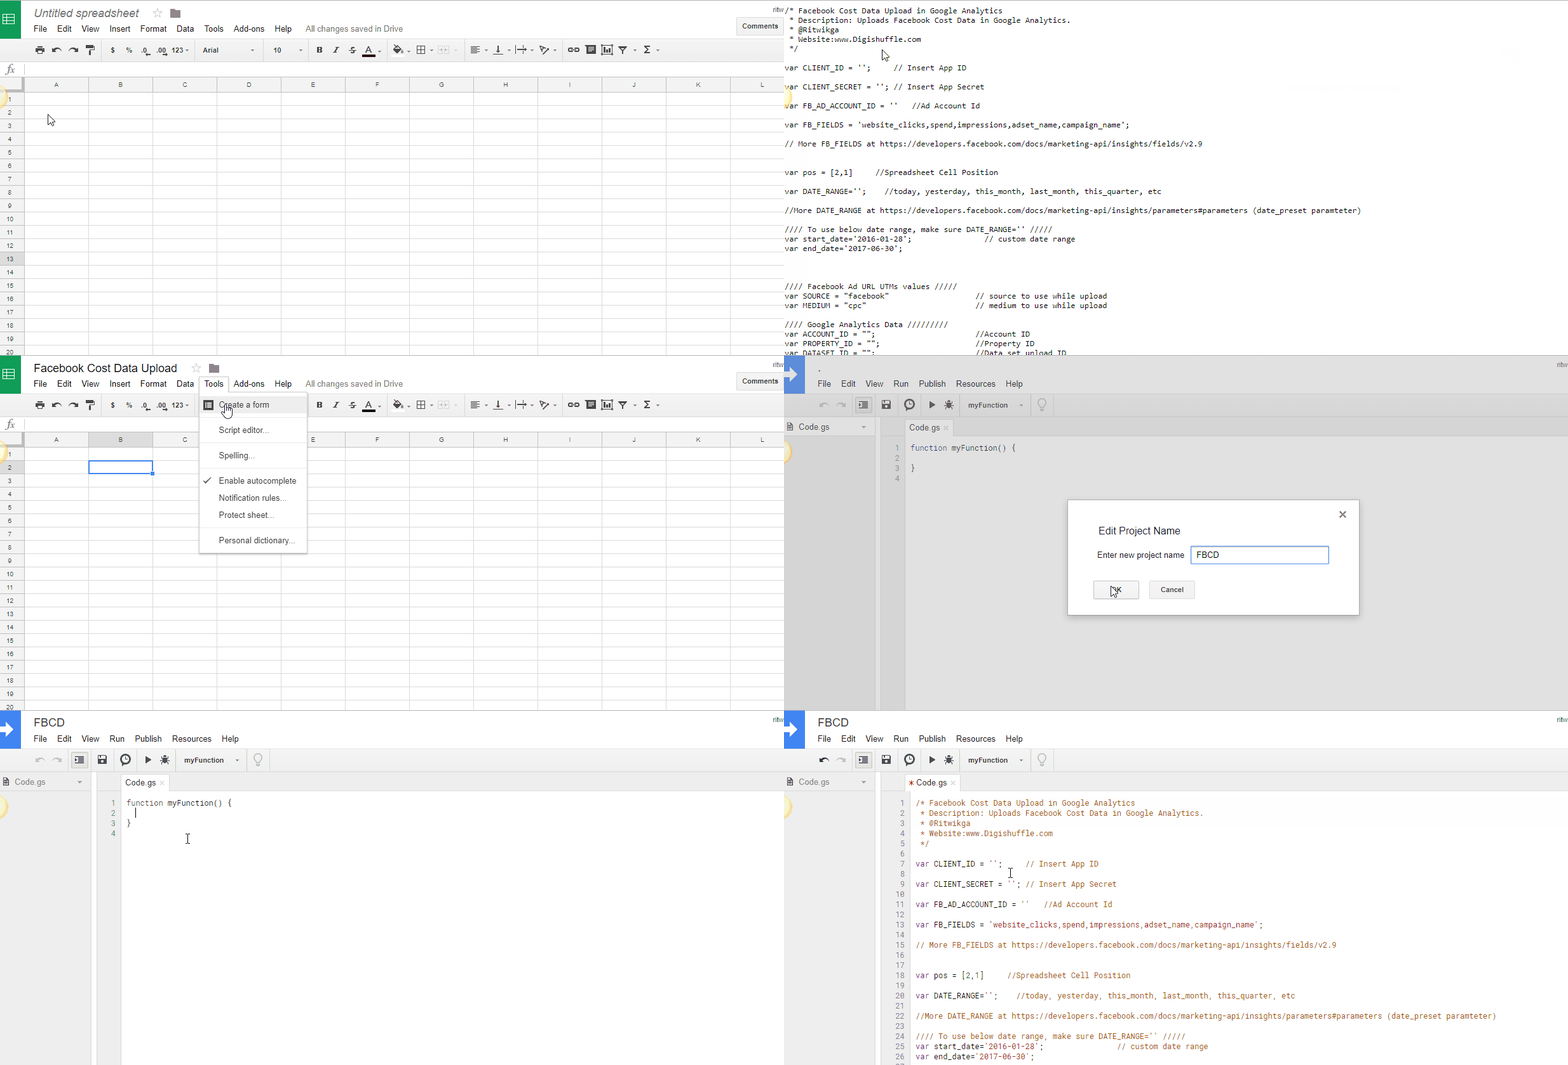
- Open & Create New Google Spreadsheet
- Go To Tools > Script Editor.
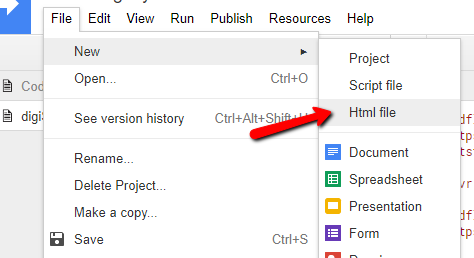
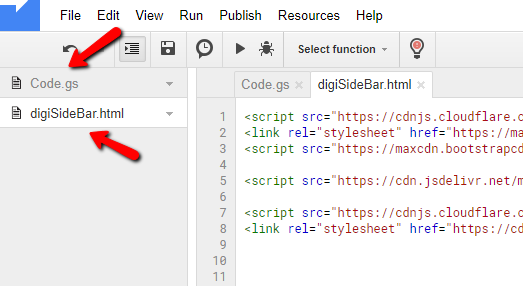
- Create another HTML file & name it as ‘digiSideBar.html’.
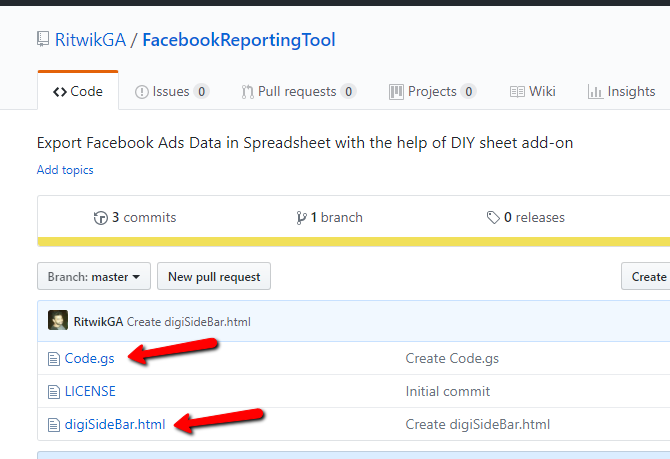
- Now you should have 2 files – Code.gs & digiSideBar.html (Don’t change these names)
- Copy & Paste the codes to these files from Facebook Cost Data Upload Script .[Updated on 08-03-2018]
- Don’t forget to name your project & spreadsheet.
(Optional:Only for Google Analytics Import Feature)
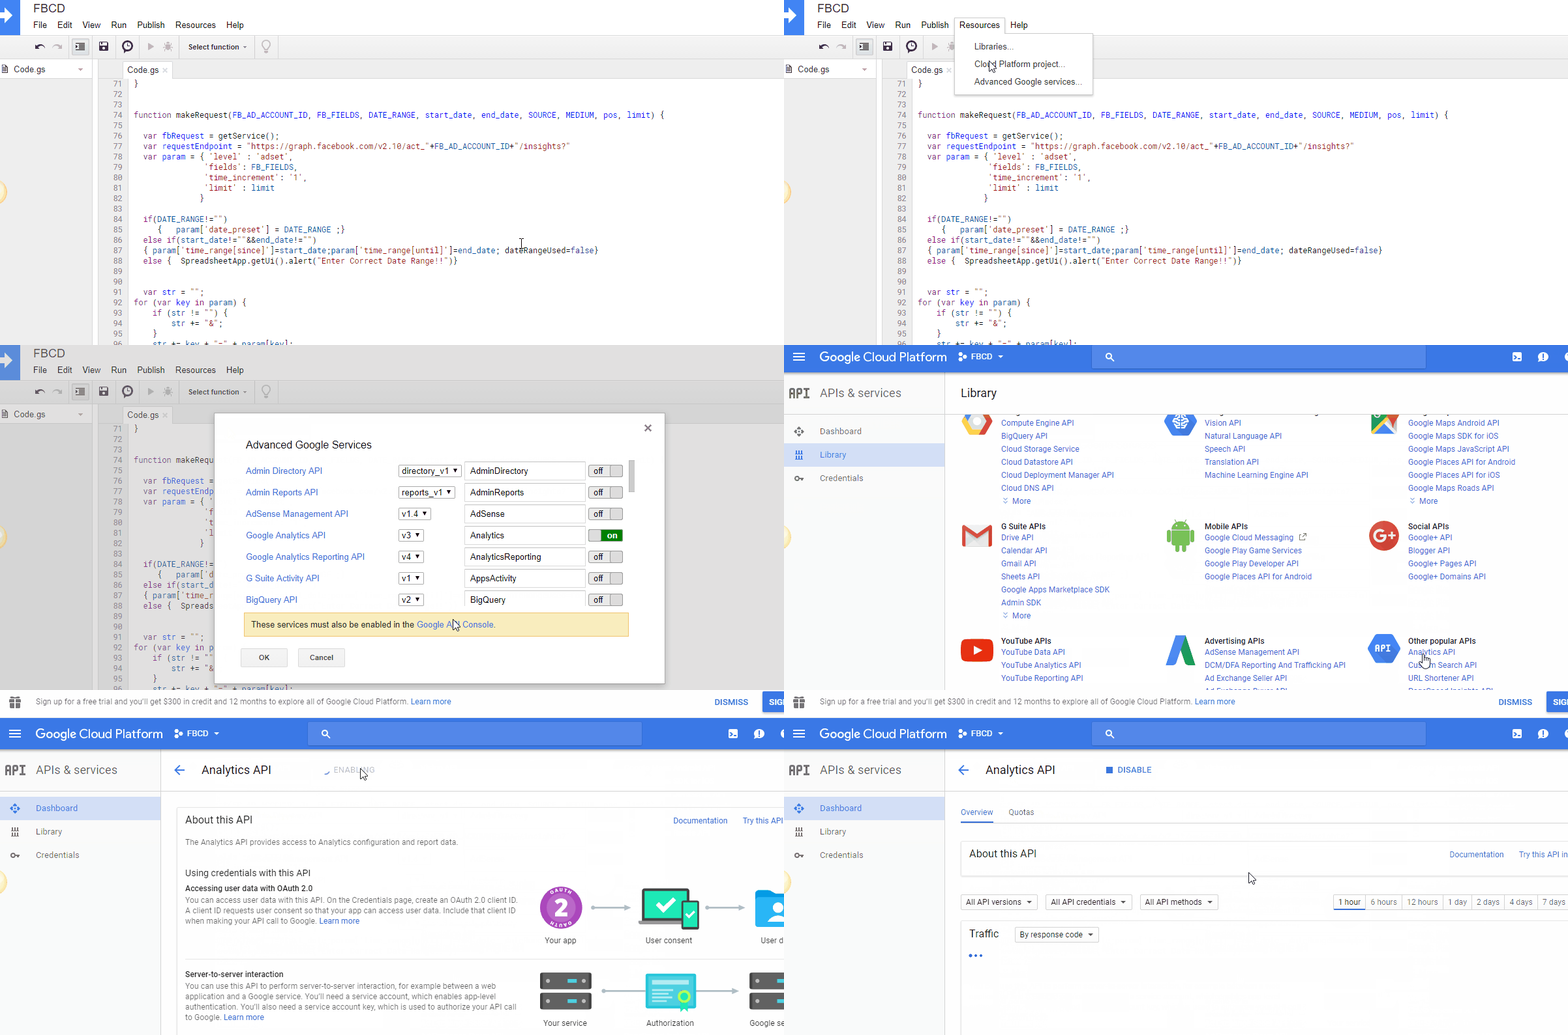
- If you want to import data to analytics, we’ll have to turn on the analytics API
- Go To Resources > Advanced Google Services > Turn on Analytics API
- Click on Google API console > Enable the Analytics API.
(Click below gif to enlarge)
Step – 2
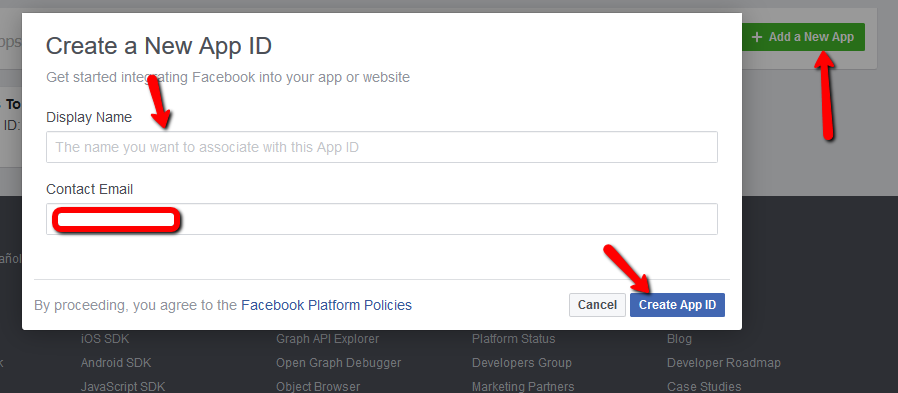
- Go To Facebook Apps
- Create & Name your App (I named ‘Ads to Spreadsheet’) > Click Create App ID.
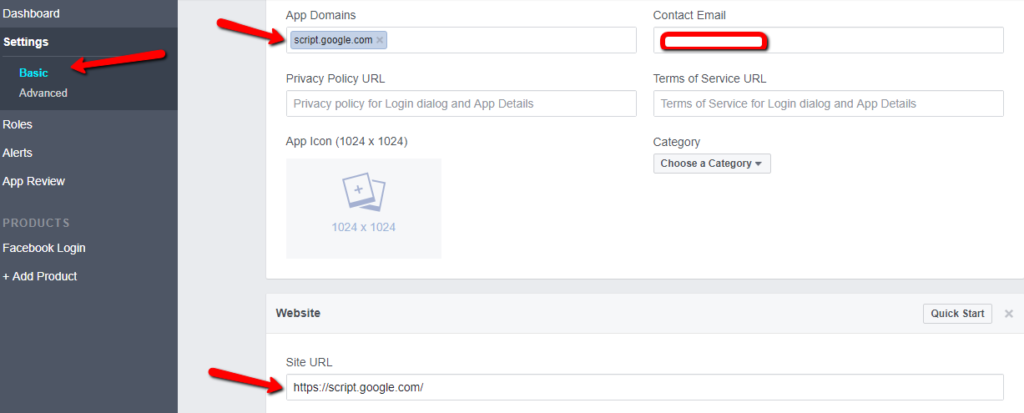
- Go To Facebook App > Settings > Basics
- Include ‘script.google.com’ in App Domains.
- Add a website & include ‘https://script.google.com/’
- Open the App > Go To Dashboards.
- Copy & Paste the
- App ID as CLIENT_ID
- App Secret as CLIENT_SECRET
in Script

Step – 3
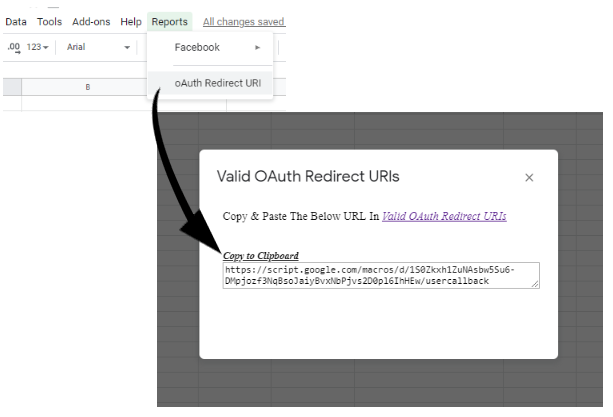
- In the Spreadsheet, click on Reports > OAuth Redirect URI & copy the URL.
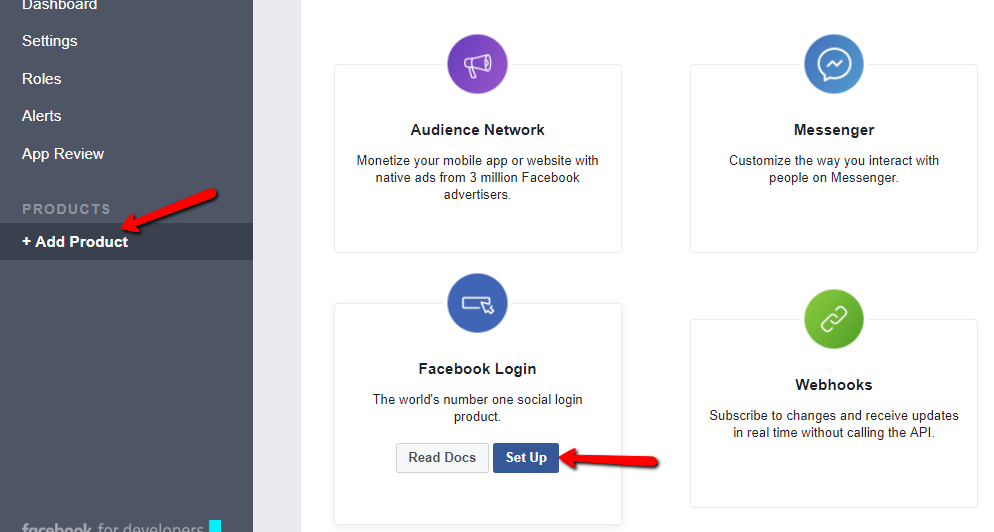
- Go To Facebook App > Click Add Product > Click Facebook Login Setup
- Go To Facebook Login > Settings
- Now, paste the copied URL in the Valid oAuth Redirect URIs & save the settings.

And Its DONE…!!!! Try Opening your spreadsheet & Authorizing your facebook account. Select an account & try exporting the data.
To upload the data to GA, simply set “isGaUpload” to true & create cost data import as follows:
Step – 1: (Optional: Only For GA Upload Feature)
- You can find the google analytics account id & property id in the account settings & property settings respectively.

- Use ‘currenyMultiplier‘ variable to multiply the ‘spend’ fields with a specific value.
- You can use it for currency conversions.
- If you want emails to be sent after successful upload, you can change ‘isEmail’ to true.
- Enter the custom ‘subject’. If blank, it will fallback to the default value. “Facebook Data Upload To GA(ACCOUNTID)“
Step – 2: (Optional: Only For GA Upload Feature)
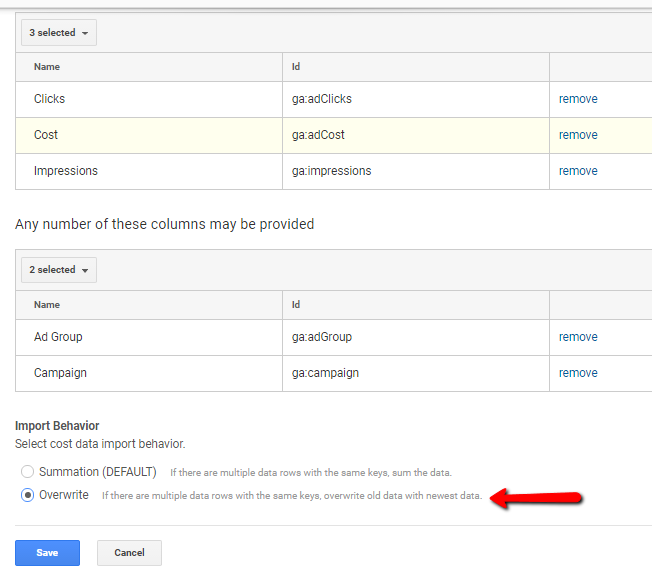
- In Analytics, Go To Data Import > Create Cost Data Import > Make sure to choose Overwrite data option.
- Click on Get Custom Data Source ID & copy paste the ID in the above script as DATASET_IDvalue.
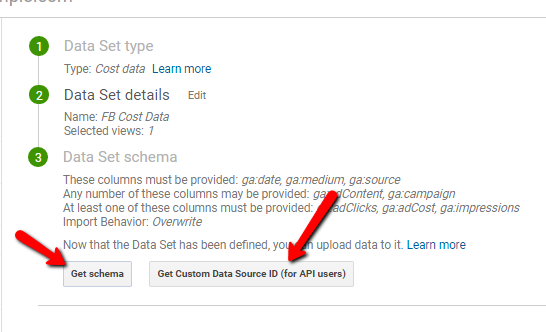
- Click on Get schema & paste it in the above spreadsheet we created.

IMPORTANT #1: The Ordering of the Schema Headers should match the FB_FIELDS in step 3.
IMPORTANT #2: Append ga:date, ga:source, ga:medium as the last columns. (without changing order)

Congratulations..!! You have successfully completed the setup.
Now, lets try running the script & then automating it.
Facebook Cost Data Import in Google Analytics: Automation
Now let’s look at the automation part:
Step – 1:
- For automation to work, you’ll need to manually fill in all the variables.
- Go To Ads Manager > Copy & Paste FB ad account ID as ACCOUNT_ID.
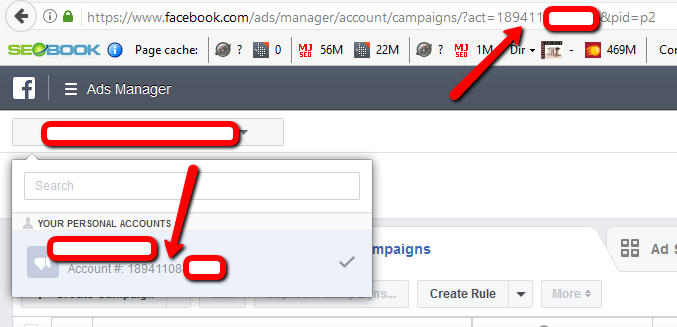
- Paste the values in below variables.

Step – 2
- You can enter the facebook ad fields to extract via API.
- Enter the fields separated by commas.
- You can find the whole list here.
- The pos field is the cell position where the data would be extracted.. Keep it as it is.

Step – 3
- The date range is for the facebook ad insights data extracted via API.
- You can enter the DATE_RANGE as ‘yesterday’ , ‘today’, ‘this_month’, etc.
Check the full list here. (date_preset variable) - For custom date range, enter the values in start_date & end_date.
- If you enter both, DATE_RANGE will take the precedence.
- The output data will be broken down daywise. It will adapt the same format compatible for cost data upload in google analytics.

- Enter DATE_RANGE or Custom date range
- Enter the UTM values used in Facebook Ad URLs.
Running & Automation Process
Running the Script:
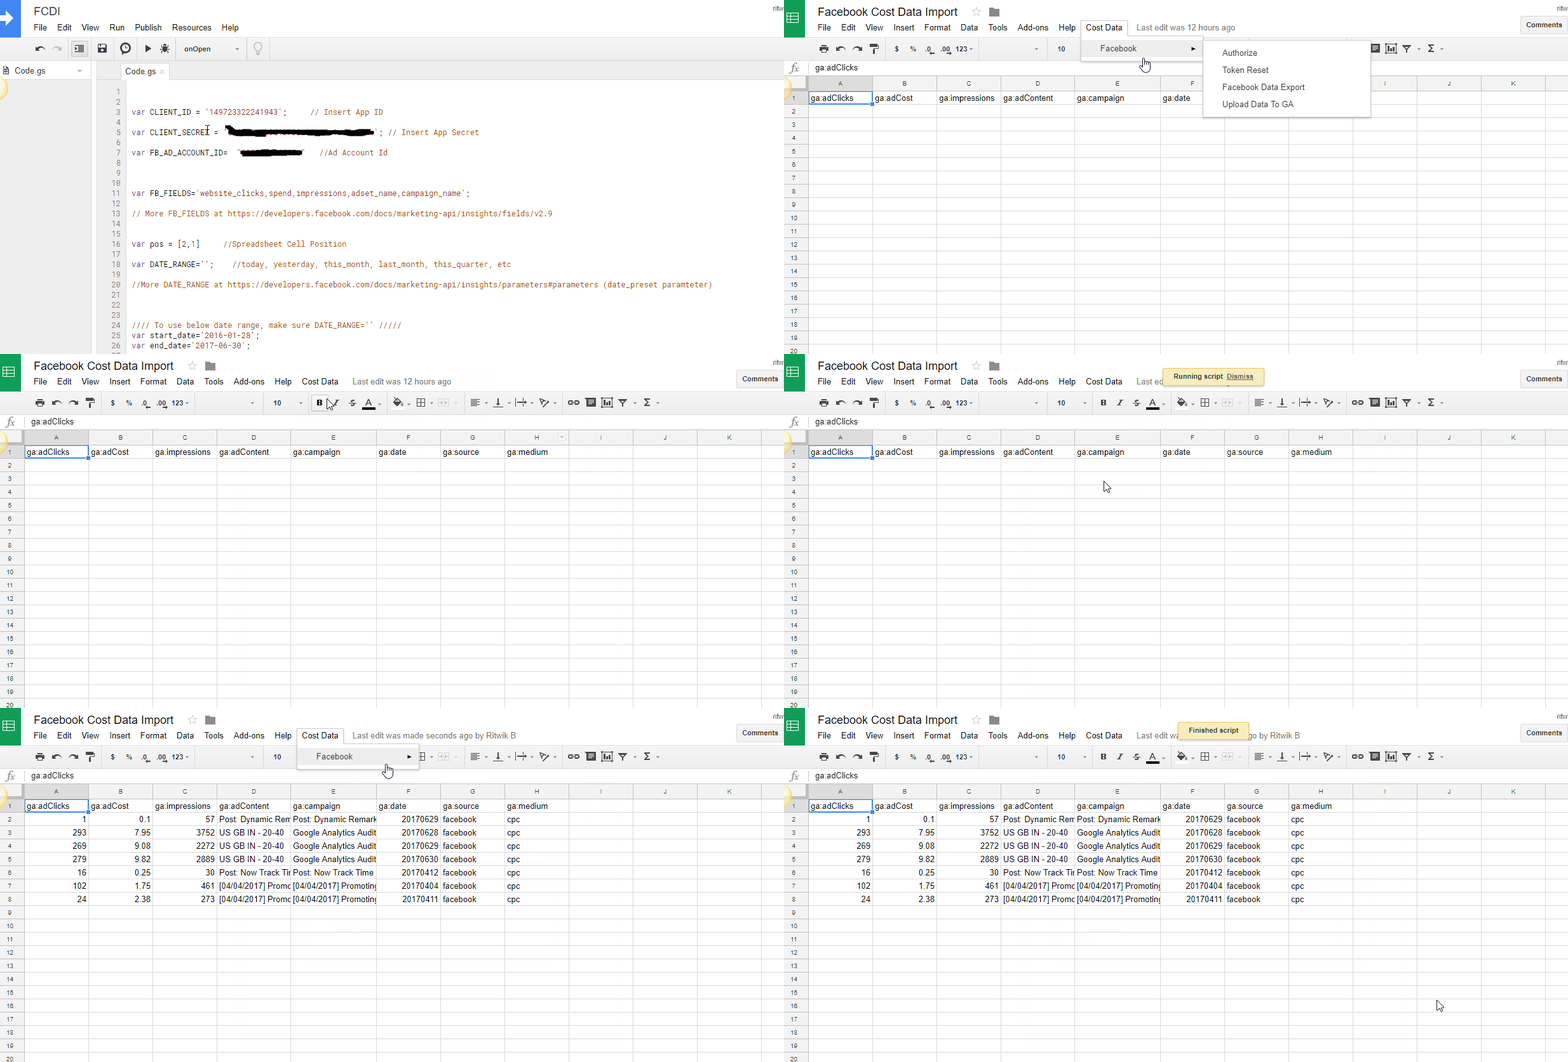
- Run the onOpen function in the project.
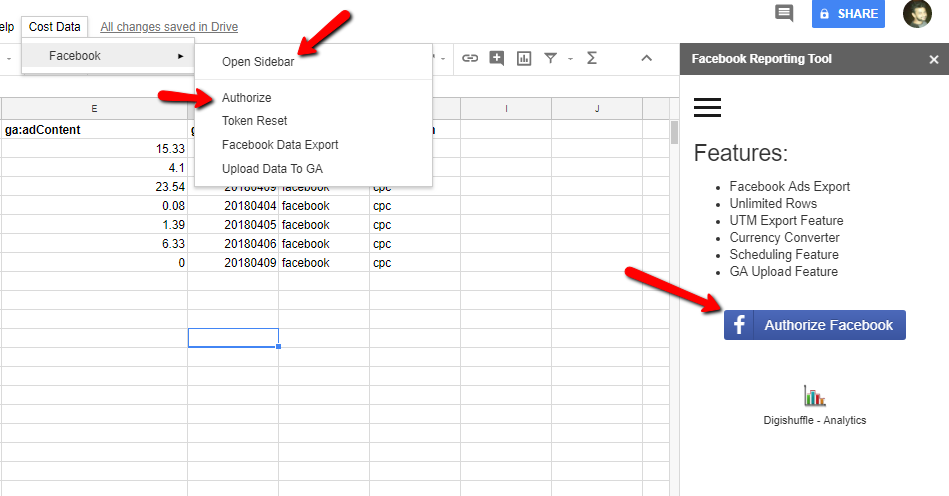
- You’ll get the drop down named ‘Cost Data’ in the spreadsheet.
- Go To Cost Data > Facebook > Authorize. Click on Authorize. Or Click On Open Sidebar > Click ‘Authorize Facebook’.
- Complete the Authorization process & close the tab after the successful authorization.
- Click on ‘Facebook Data Export’. You’ll get the facebook data in spreadsheet.
- You can then click ‘Upload Data To GA’, which will upload the data in Google Analytics.
OR
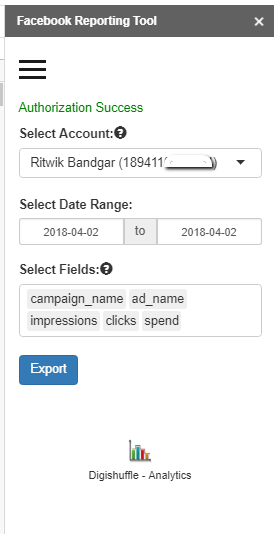
- You can use the SideBar UI to operate the settings. Currently, you can select
- Ad Accounts
- Date Range
- Fields
- Other settings will be imported from the variables defined manually.
Automating the Script:
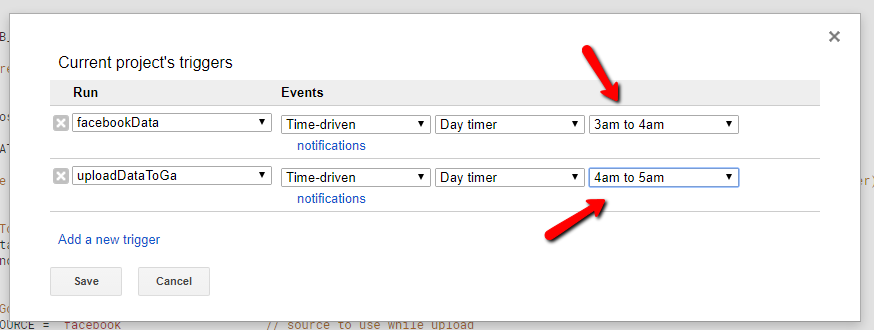
- For Automation, Go To Edit > Current Project’s Trigger.
- You can create trigger’s for 2 functions namely, ‘facebookData’ & ‘uploadDataToGa’ & trigger them consecutively. (export the data then upload the data.)
- You can use DATE_RANGE = ‘yesterday’ , so the script will upload the facebook data daily.
Facebook Add Reporting UI:
To know more about how to use the free facebook ads reporting UI, check the link.
Important Points:
- Make sure to keep an eye on the Quotas for facebook & google.
- You can run Token reset if you face any problem (Cost Data > Facebook > Token Reset) & Re-run authorization.
- Make sure ordering of FB_FIELDS is same as the schema headers in the spreadsheet. The last 3 columns (date, source, medium) will automatically be appended to FB_FIELDS. So keep them untouched.
- You can automate the ‘Facebook Export’ & ‘Upload Data To Ga’ functions daily with the date range = ‘yesterday’.
- You can also upload the data from other sources & just run ‘Upload Data To Ga’.
- Feel Free to customize the script as per your needs.
Lastly, comment or message me if you successfully implement it or face any problems. Do Subscribe for intant updates on the tool.
IMPORTANT:
- Make sure to use the v3.2 API fields & parameters.
- The script updates (thanks to your feedbacks) & replies would be done on weekends.
Errors:
If you encounter the following errors, follow the respective solutions.
#1: Authorization is required to perform that action
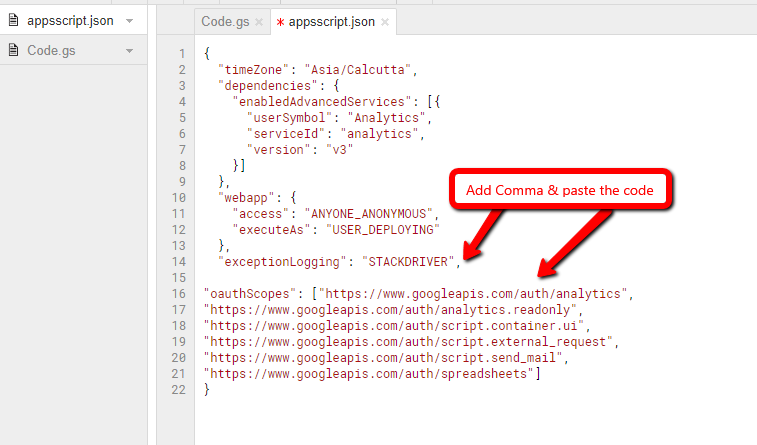
- Click On View > Show Manifest File.
- Paste the below code in appscript.json file.
- Save the file > run onOpen > Authorize
“oauthScopes”: [“https://www.googleapis.com/auth/analytics”,
“https://www.googleapis.com/auth/analytics.readonly”,
“https://www.googleapis.com/auth/script.container.ui”,
“https://www.googleapis.com/auth/script.external_request”,
“https://www.googleapis.com/auth/script.send_mail”,
“https://www.googleapis.com/auth/spreadsheets”]

Leave a Reply